

Slanted shelves for the shoes, horizontal shelves for glasses and sunglasses. But it didn’t start out to look like this…
As usual, my projects begin with some requirements, like, the project will be built here, in this closet. That’s something I can’t change, like I can’t change the requirement that it contain shelves for shoes and glasses, and that it also has to have hooks to hang hats. Exactly how that gets implemented is the artistry of a cabinet maker. And when I’m working for someone who trusts me to deliver excellence, it’s a lot easier to deliver excellence. Here is how it happened.
Location, Location, Location


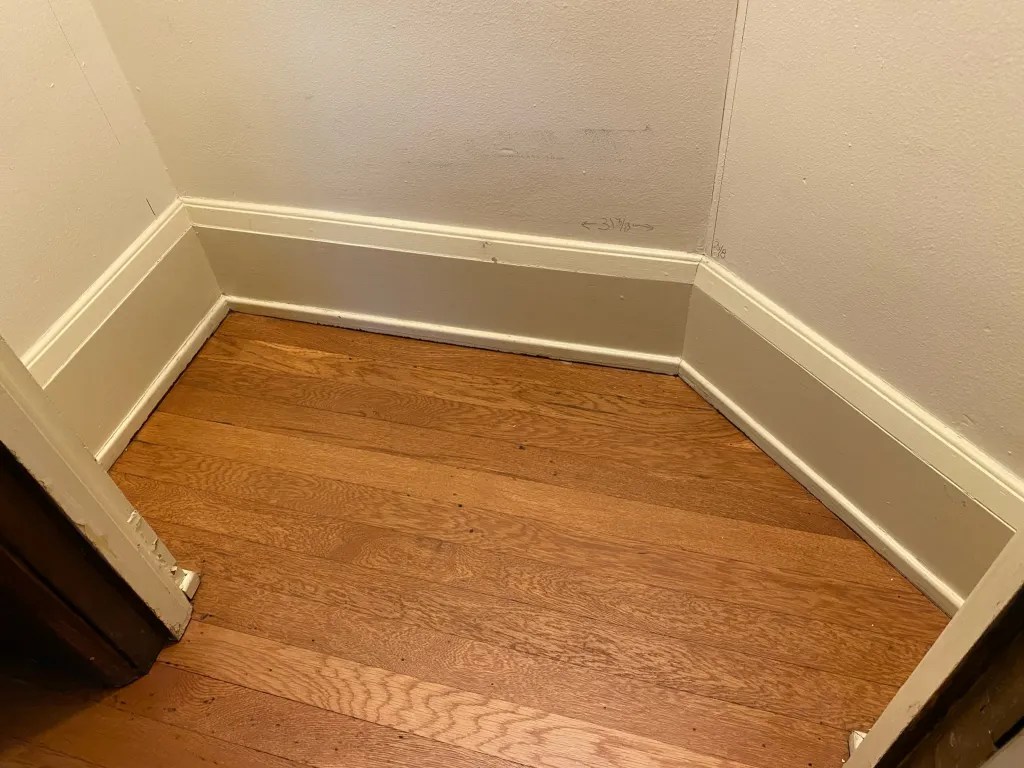

The house is big, but this closet is not so big, it’s only about 20” deep and less than 5’ wide. And its shaped oddly, where half the back wall is angled at 45 degrees and ends in a sharp point. But it’s just right to hang hats, to collect sunglasses, and to stash a collection of mens shoes and boots.
Challenges
That 45 degree wall is a problem, so is that wall safe with no known combination (what if it had a bag of jewels in there?), but the biggest problem is those walls. They are masonry, so no nails, and they are not very flat. And that 45? it isn’t really 45, more like 42.5, in a wavy, unsure kind of way.
The shelves will tilt at a 17 degree angle and the tilted shelves for the two back walls join with a butt joint where they meet. That will be an interesting miter, and there will be others. For a small space, it packs lots of challenges, and leave it up to me to make it worse! I convinced them that to make it look right, the walls really should be panelled. Over masonry? Did I actually say that?
So, Here We Go


Pergo flooring was my choice; Handscraped Heritage Hickory was his choice. Pergo is prefinished and about 3/8” thick. So it wont consume much valuable space (compared to 1 1/2” with a 3/4” board on top of a 3/4” nailer), and I wont have to apply finish in that tiny closet (more on that, later). Naturally, the ceiling couldn’t be flat and straight, it was sloped on one wall and curved on another. I attached the flooring using PL 400 construction adhesive, but to hold it as that glue set (hours), I hot glued it in place. That worked great, other than the times I got the hot glue on myself …it’s HOT! There’s a cutout for the safe. I’ll l have to make a trim ring for that. But first, a discussion about materials choices.
Materials Choices

I wanted to do live edge shelving, but I couldn’t find enough wide 5/4 boards. I had three long, wide Sycamore boards in my garage that I thought would do nicely. They were rough 5/4 boards, so I spent a few days straightening and flattening them, then cutting them to rough, oversize dimension. Then I decided …I didn’t like them, not interesting enough!

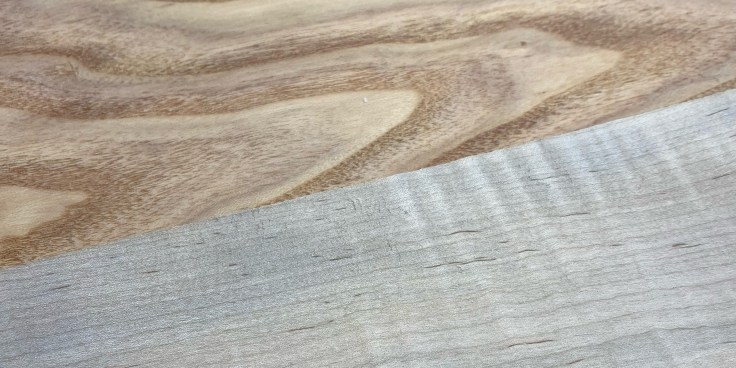
I found this instead. This is Honey Locust, another species local to the Northen Ohio area. The Honey Locust has a much stronger grain pattern that I thought would look better with the hickory panelling, and I could get it in the wide width I needed for shelves.
So, I flattened and straightened, and dimensioned this wood, too. But I wanted another species to give the shelves some contrast. I needed to add a heel catch strip near the top of each shelf, and I wanted to add a thicker nose at the front. I could use another species for those parts. I had some Curly Maple, so, yeah, that would look good, if I could get the color right.
It’s Coming Together


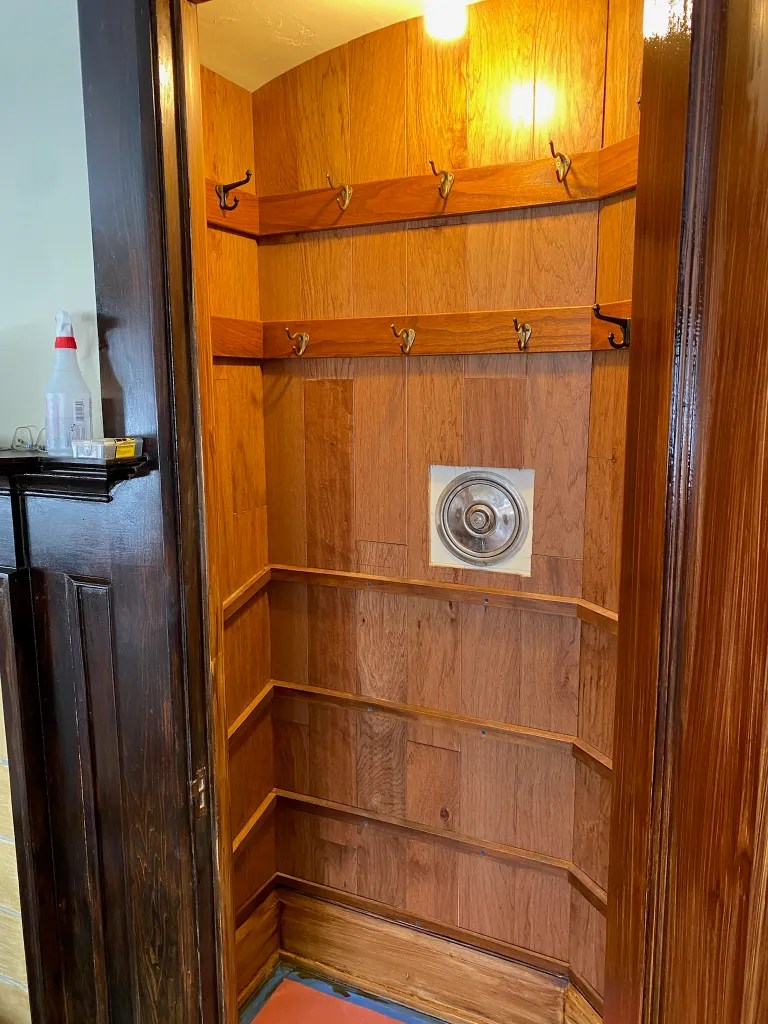

Part of the project was a place to hang hats. My client had lots of hats, from cowboy hats to flat Irish hats. We also had an assortment of hooks, old brass hooks, and some newer wrought iron-look hooks of different styles. I arranged the hooks to fit as many hats as I could without overlapping. I also used the hooks to hide the blue Tapcon masonry screws that fastened the hook rails to the wall. You can see I also added ledgers below for the shelves. Those ledgers were made of the Sycamore I dimensioned before. The last picture shows shelf brackets I made, also of Sycamore. The brackets were stained and clear coated later, but neither those nor the ledgers will be visible.
Time To Make Shelves
I had been procrastinating this for a month. Getting it right was so crucial, and there had been so much time put into everything that one wrong cut would send me back to square one, so I scared myself and decided to make the safe trim first 🙂
The Safe Trim


I had to cover the ragged edges of the paneling, and there needed to be a border that sat on top of the panelling, while the inner edge of the circle would be deeper to be flush with the safe metal. You can see how I used the curly maple as the border. Note the angle of the taper, 17 degrees, like the shelves.
Also note the color difference between the trim color in the last picture compared to the trim color in the others. Sure, there is a lighting change, but the color of the maple was altered significantly, to complement the tone of the stained Honey Locust. Before that, there was too much contrast, and the maple needed to lean more toward red/orange.

I changed the color of the maple using shellac. I started with my usual Blonde color, but that wasn’t enough, so I tried Amber. That wasn’t enough, so i added a Garnet layer …and that did the trick!
The next issue was getting the circular cutout perfect. On the bandsaw I got a rough circle, then I improved it with a 3” drill press sanding drum, but that didn’t sand evenly enough. I needed a larger diameter drum; I had to make my own.

This is a complicated step, so I created another post to show how I did id it. But you can see that the curvature of the drum is very close to the curvature of the circular cutout, so the sanded edge will be nice and even.
: A Shoe Closet
Time To Make Shelves (again)
And time to stop procrastinating! I can do it …


Yes I can, and I did. But not without the help of a small mock-up of the closet so I could test my compound miters and some of the features of the walls. I made templates that I would correct and re-test on site several times, before cutting the shelves themselves. A lot of plywood had to die in sacrifice to the Gods of Accuracy!


Here you see my shelves taped off to be stained, to keep gluing surfaces bare. The next photo is the stained shelves ready to be sprayed with clear pre-cat lacquer. The last photo was my dinner. I make nachos a lot because they taste good, and they are fun.

A shelf board completed with Curly Maple heel strip and nose. You will recognize this from an earlier photo. I had not yet added the shellac to change the tone of the maple.

Another not very good photo showing the narrow shelves for the glasses. These are upside down, as I was about to spray the clear coat, bottom first. Note the sharp angle cut into the ends. I cut this on my table saw with the boards standing on end. I have a jig for doing that. The blade burn doesn’t matter.
That’s Pretty Much It
I cut the shelves to size, and where necessary, I made some fairly difficult compound miters and tapers. In another instance of “unplanned work”, I convinced myself it was necessary to stain the existing baseboard, casing, and inside of the door. It was painted white and just didn’t look right. It took two stain coats, plus a waterbase clear coat. I dont really have a good picture of that.
But now, it’s installation time!
Installation
Installations are always fraught with anxiety. I worry that my measurements were right, and that I read them right when I made my cuts in my shop. I worry that I didn’t forget something important when loading my truck. But this time my worry was misplaced, things went great …


In the last photo you can see how I integrated the glasses shelves, by having the right end die into the slanted shoe shelves, with the front nose trim matching into the heel strip, for some color continuity. That angle is the sharp angle from the photo when I was about to spray.


All finished, with just a few touchups I’ll do later when I come back to measure for another project.

Always nice when your client appreciates your work.

Can we do something about this Dairy Queen light bulb?
Looks amazing. Your client is right – you are an artist. And a closet that nice absolutely deserves a better light fixture; I hope they get one. Only 1 constructive criticism: your nachos need tomato.