
The Situation
A young couple with a newborn moves to Shaker Heights, Ohio, from Chicago, Illinois. They want to personalize the living room to add a TV and to create some storage. It’s my job to design and build a new mantle for the fireplace and a built-in cabinet to the left of the fireplace.
For the design work I used SketchUp, a 3D drawing tool that produces a 3D file that anyone with a smartphone can view by panning, zooming, and “orbiting” around the objects to see them from different perspectives. I can text or email that file to my client and get some feedback.
So, I made the drawing, they liked what they saw and I got to work! Here is the original space:

The yellow Stabila level was not part of the original space!
And here is the drawing to show the new cabinetry:

Keep in mind that what I send them is not a static image like this, rather an interactive drawing that can be panned, zoomed, and viewed from different angles. You can even measure dimensions, such as mantle height, shelf height, or door width.
The TV
So, I will build the fireplace mantle first. The drawing shows a tv mounted over it. To do that, the mantle had to be a little lower. Also, there is some nice stone work surrounding the fireplace and we don’t want to obscure that, so I worked around it – literally. I notched the boards to show the shape of the stone. To gain some symmetry I covered some of the stone on the bottom right:

While building the mantle, my clients decided that they would like to have sliding barn doors to cover the tv. To do that I suggested lowering the profile by recessing the tv into the wall and attaching directly to the brick of the chimney. That brick was in very nice condition, so I sealed it and fastened the tv mounting bracket to the brick.

You can see some wiring there. Part of the job is to provide a power outlet for the tv and to rout wiring into the built-in cabinet that will be on the left later. The plan was to tap the power from the sconce lighting, which will be removed. That plan fell apart when I learned that the circuit was already overloaded. Fortunately, there was a nearby outlet that was on an office circuit that was very lightly loaded, so I used that. The blue tube on the left is a flexible pipe I used to snake the HDMI cable, allowing room for more cabling in the future.
Meanwhile, back at the shop, the mantle is taking shape:
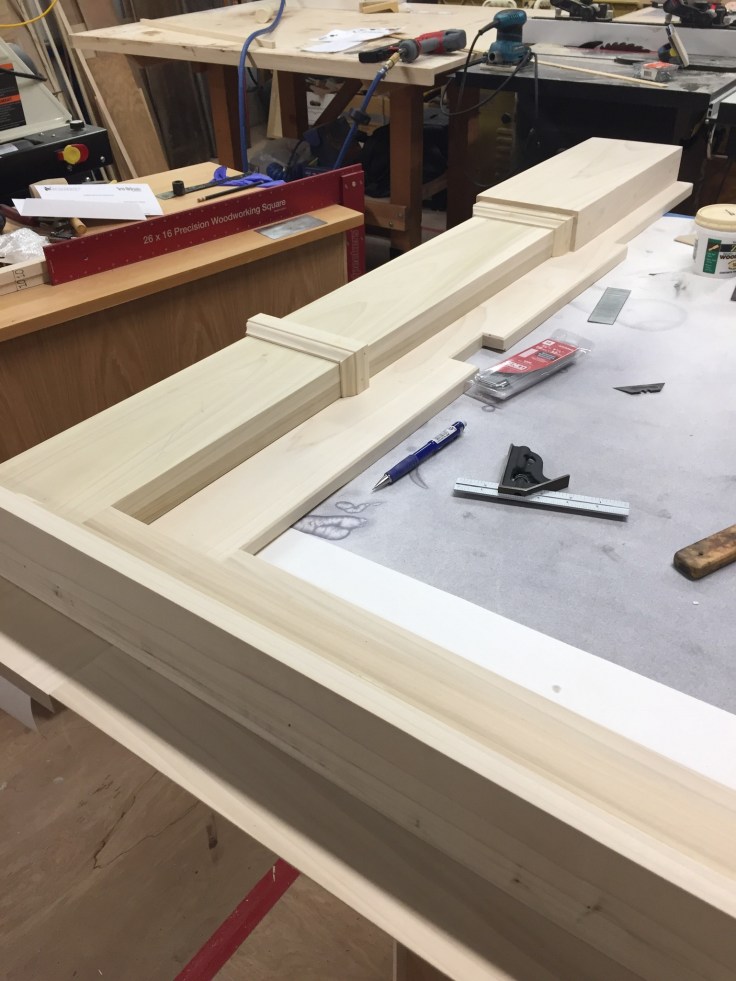
It is in two pieces. A flat piece that notches around the stone, and the top piece that has the detail. They are connected by four French cleats. The reason to have two pieces is so I can do some ugly fastening to the existing wall and have those big screws hidden by the top layer. That way there isn’t much fastening going into the finished surface.
Barn Siding
Where to get barn siding? Well, it seems Ohio is not a bad place to look for barn wood. I found some very nice wood about an hour away from me. It was so nice I bought a bunch extra. This guy had old barn siding, barn beams, barn foundation stone, metal roofing – loads of old salvage. Here is a picture of some of the siding:

Some of these boards are 16″ wide! I brushed them down with a stiff brush and sealed them with a vinyl sealer so they wouldn’t shed once installed. More on that in another post.
I also found some nice hardware for the doors. Here they are finished in my shop:

Completed
So the mantle and the barn doors are done. I have the wiring ready for the built-in, which will contain all the A/V gear behind doors in the bottom of the cabinet. I provided a temporary outlet for them while I build the new cabinet:


There will be a sound bar below the tv that will hide the wiring, so it doesn’t need to be tidied up.
The Built-In Bottom
Next up is the built-in cabinet. Four shelves, four doors. The doors are frame-and-panel. I was considering a Shaker style door, which is very plain, but similar to the kitchen cabinets. Since the house is French Colonial, I thought some curves would help, so I used an ogee profile. Zoom in to see the inside door panel edges better:

Two things about this picture; first, you can see the electrical box that will have two duplex outlets for power. Second, you see that some of the parts are painted, while others aren’t. The reason for painting some parts in advance is that they are easier to paint before assembly. I spray pre-catylized lacquer, which is very thin and durable. It can also be touched up. I deliver the cabinets completely finished. After installation, I fill nail holes and repaint with an airbrush. This results in a beautiful even finish.
Another thing is the wood species. Most of this is maple, but some parts are poplar, and the large panels are birch plywood. Maple and poplar are fairly straight grained and well behaved, but maple is a little harder, so it will always be used for doors and other areas that might take some abuse.
Here is the base installed, but not yet trimmed:

I use concealed “Euro style” Blum hinges. High quality, and these have a soft-close feature, which is nice.
The Built-In Top
The top will have four shelves, two fixed and two adjustable. I use recessed tracks for the shelving. The second shelf is fixed because there is another addition to the job – cabinet lighting. The top shelf will be lit and the bottom shelf will be lit. I fixed the second shelf so lighting could be attached underneath to illuminate that bottom shelf.
The adjustable shelving is made with two pieces of Baltic birch plywood glued together with a solid maple nosing on the front. This makes for a very sturdy shelf – maybe overkill, but I like it!
Clamping up the top cabinet carcass. You can’t have too many clamps!

And now clamping up the shelving. What better way to use a $900 piece of old growth Hawaiian koa?

The LED Lighting
I convinced my clients that LED lighting was the way to go. Not only does it play well with the existing house wiring by being low power, but it is also very flexible. I used what is called strip lighting. This is a thin strip that is really a very long circuit board, containing many tiny LED lights evenly spaced along its length. The one I used could be snipped every inch. Each inch had 3 LEDs, here’s a picture of it installed:

Note that the lights themselves are not easily visible. I had to do some gymnastics to get this shot.
Since LED lighting requires DC current, you need a low voltage power supply. These types of lighting systems are either 12V or 24V. This one is 12V and the power supply can sustain a 45 Watt load, which is double what these lights will consume at maximum power:

I say at maximum power because it is best to operate LED lighting below its max. The lights will last longer if you keep them at 50 – 75%. In order to do that, I added more lights than necessary, and provided a dimmer. That’s the little round black thing in the picture below:

This is a dimmer as well as an on/off switch. Hold your hand in front then move it away to turn on/off. Hold your hand still and the lights will cycle slowly up to full power, then back down to no power. Take your hand away when you like the light level. It will remember the last setting. Only costs $20.
The Cabinets Are United
The top cabinet is fastened to the wall and to the bottom cabinet. Wiring was done to connect the lights with the power supply and dimmer:

Finishing The Trim
This was a bit of a challenge. I had to match existing trim, and the shapes used are not normally available, so I had to make them myself. The baseboard was not that difficult. I had an odd 50 degree angle, but not a big deal. The shoe was a different story; it had two roundovers of different radii:

And there were lots of corners. Lots of inside corners, which all have to be coped. I made all the pieces in my shop and put them together on site. I also filled in a few spots where trim was missing. So this is the final base trim:


Done In Time For Christmas!
So, room is complete, including new furniture, and ready for decorating. This is just a start, I’m sure, but I’ll see the rest in a few days when I install a radiator cover and bookcase in the nursery upstairs:


Making cabinets is fun. Designing cabinets is funner.
Leave a Reply